A Comprehensive Guide to Integrating the ZKTeco Biometric System

Introduction
Biometric authentication is becoming an essential security measure in various industries, including fitness centers, offices, and secure facilities. Among the leading biometric devices, ZKTeco provides advanced fingerprint and facial recognition solutions that ensure high security and seamless access control. This guide will walk you through the integration process of the ZKTeco biometric system, highlighting key steps, best practices, and troubleshooting tips.
Table of Contents
- Understanding ZKTeco Biometric System
- Benefits of ZKTeco Integration
- Hardware and Software Requirements
- Installation and Setup
- Connecting ZKTeco Device to the Network
- Integrating with an Application
- Testing and Troubleshooting
- Best Practices for Smooth Operation
- Conclusion
Understanding ZKTeco Biometric System
ZKTeco is a global leader in biometric security solutions, offering devices that support fingerprint recognition, facial recognition, RFID, and password-based authentication. These devices are widely used for access control, attendance tracking, and security management.
Insert Image: ZKTeco biometric device
Benefits of ZKTeco Integration
- Enhanced Security: Eliminates the risks of unauthorized access.
- Automation: Reduces manual entry errors and enhances efficiency.
- Scalability: Suitable for small businesses and large enterprises.
- User Convenience: Quick and easy authentication process.
- Real-Time Monitoring: Enables live tracking of user access and attendance.
Hardware and Software Requirements
Hardware:
- ZKTeco biometric device (Fingerprint/Face Recognition model)
- Power adapter
- Ethernet or Wi-Fi connectivity
- Computer or server for integration
Software:
- ZKTeco SDK (Software Development Kit)
- API for communication
- Database for storing biometric data
- Programming languages: C#, Python, JavaScript (depending on integration)
Installation and Setup
- Unbox the Device: Ensure all components are present.
- Mount the Device: Install it at a convenient height for user access.
- Power Up the Device: Connect to a power source.
- Initial Configuration: Set up time, date, and device ID.
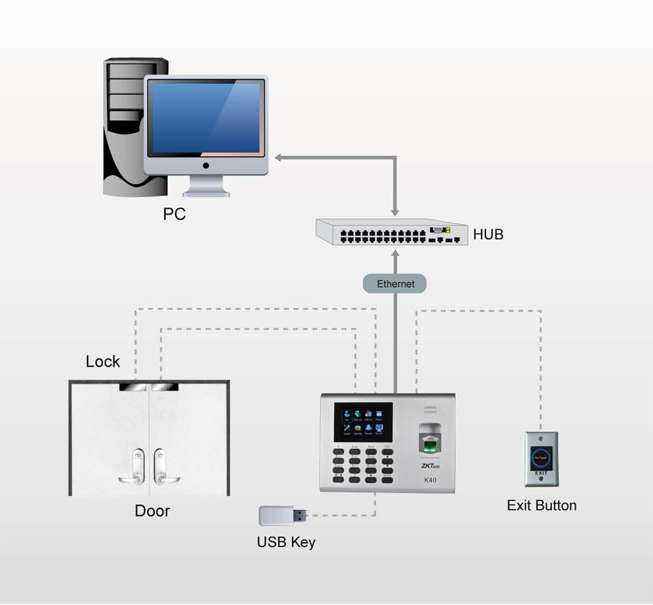
Connecting ZKTeco Device to the Network
- Wired Connection: Use an Ethernet cable for stable connectivity.
- Wireless Connection: Configure Wi-Fi settings if supported.
- Assign IP Address: Ensure the device has a static IP for seamless communication.
- Test Connectivity: Ping the device from a computer to verify connection.
Integrating with an Application
To integrate ZKTeco with an application, follow these steps:
Step 1: Install SDK
Download and install the ZKTeco SDK from the official website.
Step 2: Establish Connection
Use the SDK’s API to connect the device with the application.
zkemkeeper.CZKEM zk = new zkemkeeper.CZKEM();
bool isConnected = zk.Connect_Net("192.168.1.100", 4370);
Step 3: Fetch User Data
Retrieve user information from the device.
string name;
int userID;
zk.GetUserInfo(1, out userID, out name, out _, out _);
Step 4: Store Data in Database
Save the retrieved data into an SQL Server or Firebase database.
Testing and Troubleshooting
Common Issues and Fixes
- Device Not Connecting: Check network settings and firewall rules.
- Data Not Syncing: Verify API calls and database connections.
- Slow Authentication: Optimize biometric templates and server response times.
- User Not Recognized: Ensure proper enrollment and clean sensor surface.
Best Practices for Smooth Operation
- Regularly clean the biometric sensor for accurate readings.
- Keep firmware and software updated.
- Backup biometric data periodically.
- Set up alerts for unauthorized access attempts.
- Train users on proper fingerprint placement and usage.
Conclusion
Integrating the ZKTeco biometric system enhances security, streamlines access control, and improves operational efficiency. By following this guide, you can successfully install, configure, and integrate ZKTeco into your system while ensuring smooth performance and troubleshooting common issues.
For further details, refer to ZKTeco Official Website or explore API documentation for advanced integrations.